.png)
When using a Docker container as your build environment, you’ll also want to develop your firmware inside the container. This is so that you can take advantage of VSCode’s project tools for quickly finding system headers, library headers, etc that are part of the Docker image, and don’t exist in your firmware project.
Luckily VSCode has a great feature that allows developers to easily develop inside a Docker container.
To take advantage of this you'll need to first install the Dev Containers extension.
Next, create a top-level folder called {% c-line %}.devcontainer{% c-line-end %}. Inside {% c-line %}.devcontainer{% c-line-end %} create a file called {% c-line %}devcontainer.json{% c-line-end %}.
In {% c-line %}devcontainer.json{% c-line-end %} add the following:
{% c-block language="json" %}
{
"name": "My Dev Container",
"dockerComposeFile": "../docker/docker-compose.yml",
"service": "my_build_dev_service",
"workspaceFolder": "/workdir/project",
"customizations": {
"vscode": {
"extensions": [
"ms-vscode.cpptools-extension-pack"
]
}
}
}
{% c-block-end %}
{% c-line %}name{% c-line-end %} - This can be anything, and is just a description of the container you’re going to attach to
{% c-line %}dockerComposeFile{% c-line-end %} - This points to the Docker compose file you’re going to create. The Docker compose file is a YAML file used to configure your Docker container.
{% c-line %}service{% c-line-end %} - This is the name of the Docker service that your Docker Compose file is going to create
{% c-line %}workspaceFolder{% c-line-end %} - This is the location inside your Docker container that your local project files are mounted to
Now create a {% c-line %}docker-compose.yml{% c-line-end %} file and place it somewhere in your project. In this example it’s placed in a top-level folder called {% c-line %}docker{% c-line-end %}.
In {% c-line %}docker-compose.yml{% c-line-end %} add the following:
{% c-block language="yaml" %}
version: '3.7'
services:
my_build_dev_service:
image: nordicplayground/nrfconnect-sdk:main
ports:
- "8080:8080"
command: /bin/bash
environment:
- CI=false
tty: true
volumes:
- ..:/workdir/project
- type: bind
source: ${HOME}/.lager
target: /root/.lager
{% c-block-end %}
{% c-line %}version{% c-line-end %} - The file format version of your Docker compose file.
https://docs.docker.com/compose/compose-file/compose-versioning/
{% c-line %}services{% c-line-end %} - This is a list of the services that you want your Docker compose file to spin up. In our case we only have one service, which is our build container (service)
{% c-line %}my_build_dev_service{% c-line-end %} - Name of the service (container) you are spinning up. This should match what is in {% c-line %}devcontainer.json{% c-line-end %}
{% c-line %}image{% c-line-end %} - this is the name of the Docker image you’re using to build your project. For example if you’re developing a Zephyr project with nordic connect you would specify {% c-line %}nordicplayground/nrfconnect-sdk:main{% c-line-end %}
{% c-line %}port{% c-line-end %} - These are the ports you want exposed to your Docker container. Port 8080 is normally used for web servers.
{% c-line %}command{% c-line-end %} - This is the executable that will run in the Docker container. Running {% c-line %}/bin/bash{% c-line-end %} will give you a bash terminal.
{% c-line %}environment{% c-line-end %} - If you want to specify any environment variables in your Docker container you can specify them here.
{% c-line %}tty{% c-line-end %} = true - This allows you to keep the container running after running {% c-line %}/bin/bash{% c-line-end %}
{% c-line %}volumes{% c-line-end %} - This specifies what folders to mount from your local computer into your Docker container, and where to mount it. This one is very important, because it allows you to make changes to your project from within VSCode. The first parameter is the folder you want mounted into the Docker container. In this example it’s the folder one level up mounted in {% c-line %}/app{% c-line-end %}
{% c-line %}type{% c-line-end %} - The type of mounting, e.g [bind mount](https://docs.docker.com/storage/bind-mounts/)
{% c-line %}source{% c-line-end %} - Files you want copied into the Docker container
{% c-line %}target{% c-line-end %} - The target location of your source files. In this example we are copying the global {% c-line %}.lager{% c-line-end %} file so that you have access to the lager API from VSCode
Now make sure your specified Docker image has been pulled, e.g. {% c-line %}docker pull nordicplayground/nrfconnect-sdk:main{% c-line-end %}.
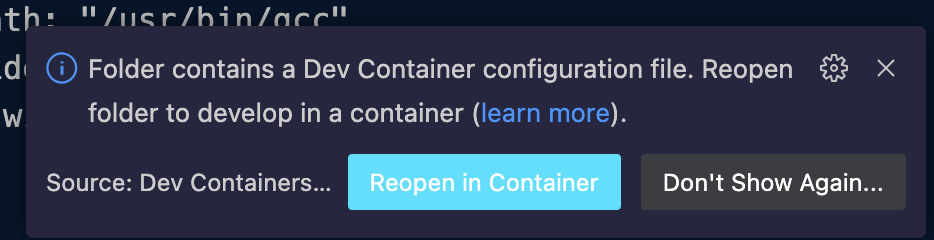
Finally go to your project folder and open VSCode, {% c-line %}code .{% c-line-end %} When VSCode starts you will be given a pop-up asking if you want to re-open the project in your container, select {% c-line %}Reopen in Container{% c-line-end %}.
And, if you're interested in testing it out yourself you can do the following:
{% c-block language="bash" %}
docker pull nordicplayground/nrfconnect-sdk:main
git clone https://github.com/lagerdata/sdk-nrf-docker-example.git
cd sdk-nrf-docker-example
code .
{% c-block-end %}
Reach out to learn more about Lager's hardware test automation platform.
Try One Month Free
hello@lagerdata.com
